Setup Guide for the eDoc App
Preparation
Please check in advance whether you have the necessary authorization for the eDoc setup (authorization set BRAG EDOC INTERFACE)!
On-Premise Installation: Please check whether the module has been added to your customer license. The assignment of the app is done by the responsible Microsoft partner. The module name is: 5518500 brAG ZUGFeRD Interface.
Step 1: App Setup Settings for BC (Cloud and On-Premise)
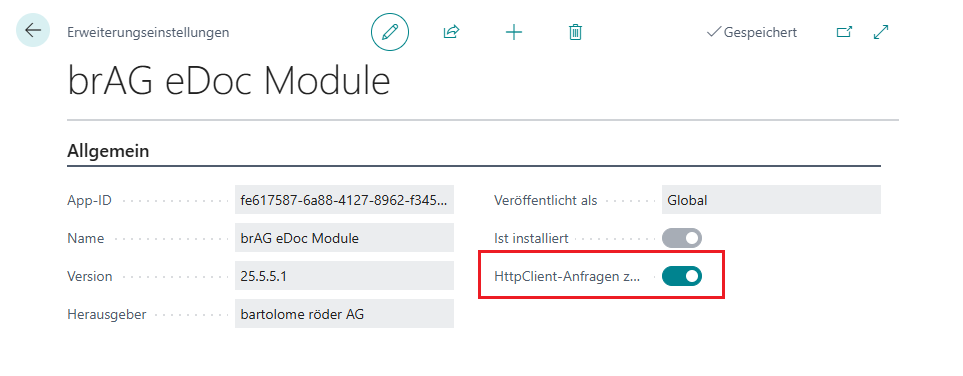
After installation, for BC Cloud and BC On-Premise, the checkbox Allow HttpClient requests must be set in the app's extension settings!
To do this, open the Extension Management:
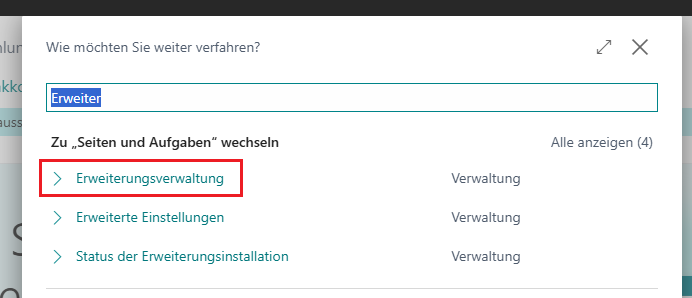
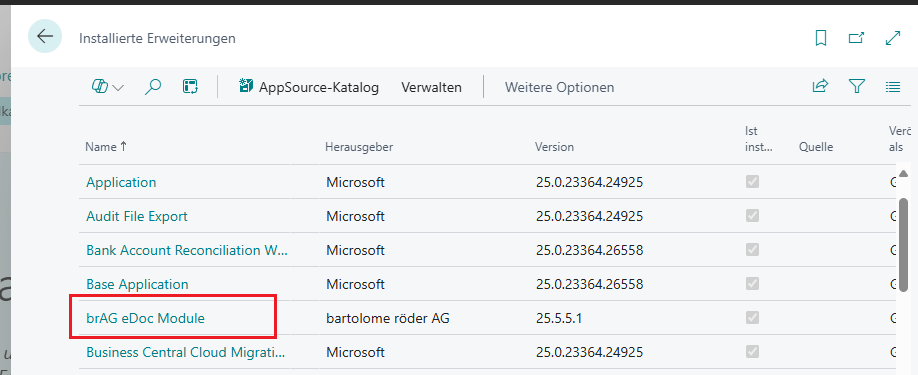
Then search among the installed extensions for the app brAG eDoc App:
Then set the checkbox Allow HttpClient requests:
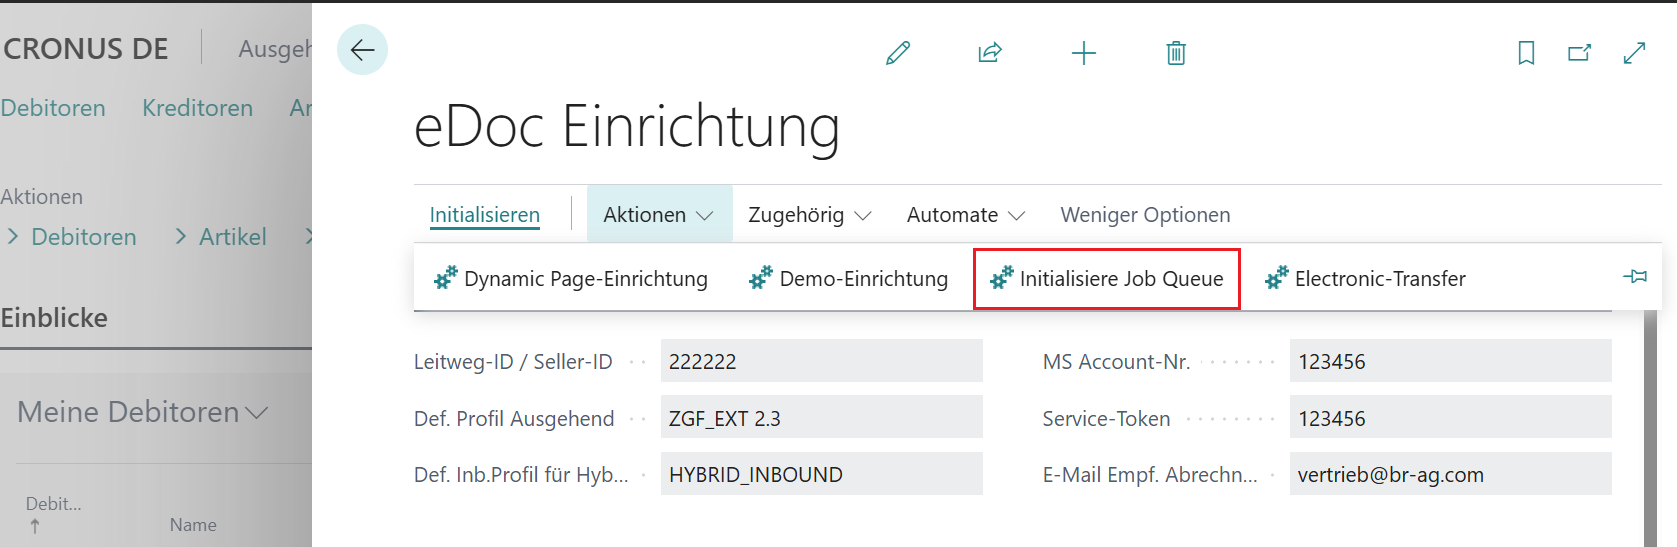
Step 2: Initialization
For initialization, the Dynamic Page setup, Demo setup, Job Queue initialization, and Electronic Transfer must be executed once.
Dynamic Page Setup Initialization of the Dynamic Page (Dynamic request page for entities and fields, containing control parameters for outbound mapping).
Demo Setup Fills all fields relevant for inbound and outbound in the 'General' tab.
Initialize Job Queue (since version 5.5) Initialization of the task queue; necessary for batch processing
Electronic Transfer Initialization of the Endpoint Mgmt. (Electronic document format, document send profiles, eDoc endpoints, eDoc customer endpoints)
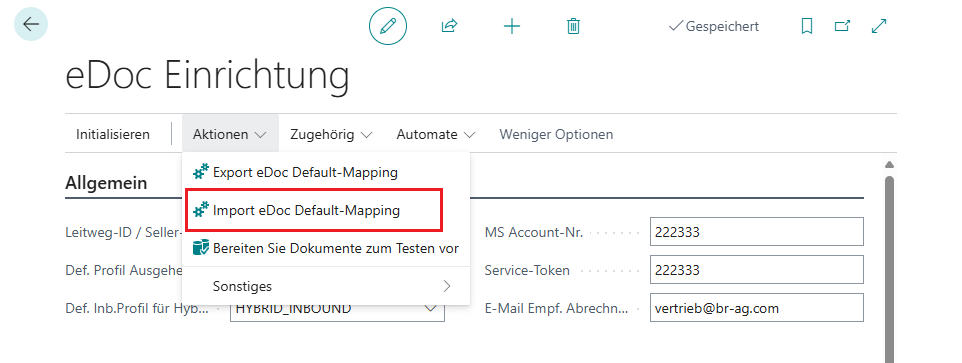
Step 3: Import eDoc Default Mapping
Creation or update of the initial mapping. In addition to the profiles, the data records necessary for the mapping are processed.
-
eDoc Codes
-
Transformation Rules
-
Custom Fields
-
Custom Field Mapping
-
eDoc Profiles
-
eDoc Profile Lines
-
eDoc Profile Mapping
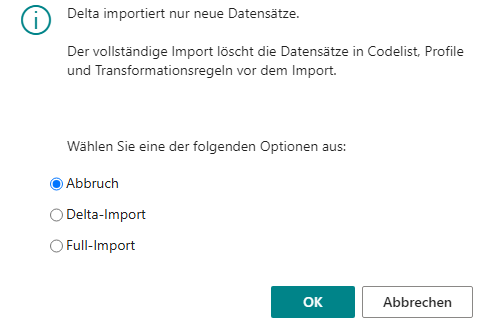
Cancel The operation will be aborted, no data records will be imported.
Delta Import Recommended. The delta import adds new records; existing records in the above tables are not changed.
Full Import The full import deletes the records before importing.
eDoc Code List Mapping
Within electronic data exchange, codes from defined code lists are used for certain
information. These follow
UN/ECE Recommendation No. 20 and UN/ECE Recommendation No. 21.
For example, the standard code (H87) in BC corresponds to the
unit of measure piece.

You can find the corresponding lists here:
Source: https://unece.org/trade/uncefact/cl-recommendations
eDoc Profile Mapping
In some e-invoice formats (especially ZUGFeRD or XRechnung), the field IncludedNote is available. IncludedNote is used to transmit additional textual information directly in the electronic invoice. These are free text fields where specific notes, comments, or important remarks can be entered that are relevant for processing or the legal validity of the invoice.
This information includes, among others:
-
AAI (General Information): Important general notes that apply to the entire invoice.
-
SUR (Seller's Notes): Additional comments or explanations from the seller, e.g., special conditions or agreements.
-
REG (Regulatory Information): Notes on regulations or legal requirements.
-
ABL (Legal Information): Details on legal matters, such as contract terms or liability clauses.
-
TXD (Tax Information): Tax-relevant notes, such as specific tax regulations or exemptions.
-
CUS (Customs Information): Details for customs-relevant processes, e.g., export or import regulations.
The assignment is located in the respective eDoc profile mapping.
The complete code list is specified in UNTDID 4451: UNTDID 4451 - Free Text Fields
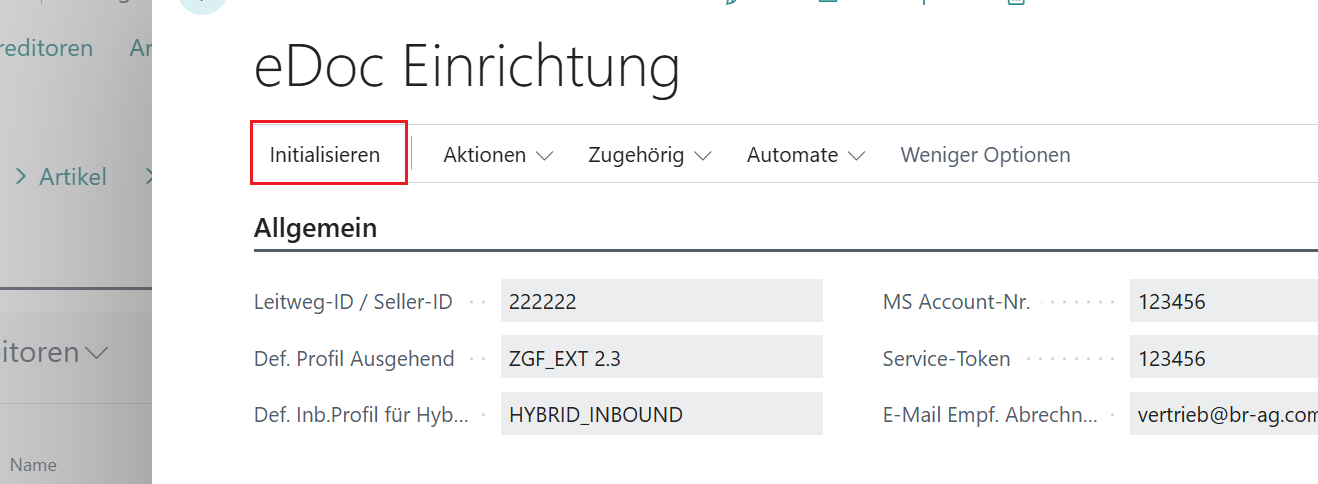
Step 4: Setup
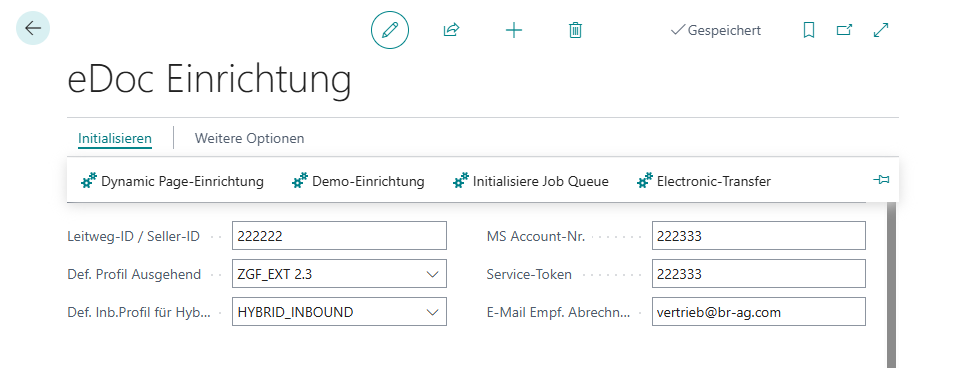
General Setup
Here you must now customize MS Account No., Service Token, Invoice Email Recipient to your customer-specific settings.
Screenshot
The following fields must be entered here:
-
MS Account No. Required for transmission to the web service.
-
Service Token You receive this from bartolome röder AG.
-
Invoice Email Recipient Email for identification at the web service
Step 5: Task Queue and Batch Processing Inbound
To use the inbound batch processing, initialize the Job Queue if not already done. To do this, click under Setup/General/eDoc Setup
on Initialize
and then on Initialize Job Queue, see screenshot.
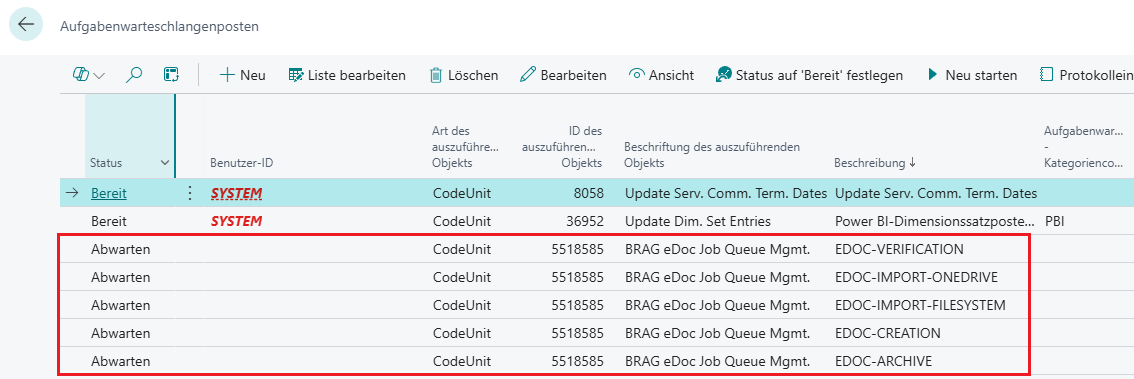
The following 5 entries are created in the list 'Task Queue Entries' :
-
EDOC-IMPORT-FILESYSTEM Reads a file from the file system. Not available in the cloud!
-
EDOC-IMPORT-ONEDRIVE Reads a file from OneDrive.
-
EDOC-VERIFICATION Checks an eDoc (intermediate document)
-
EDOC-CREATION Creates the BC document
-
EDOC-ARCHIVE Archives an eDoc
See also The Inbound Process
To configure or activate these batch jobs, first switch to the menu 'Task Queue Entries'
Then click on the entry you want to edit
and switch to the corresponding card
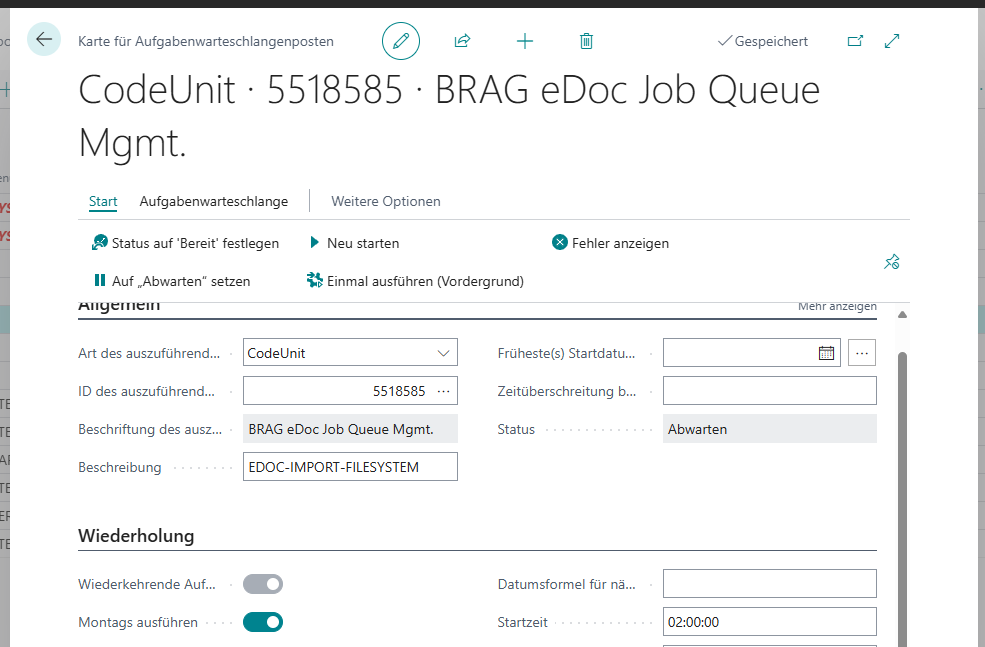
To activate the batch job, set status to 'Ready' and click

OneDrive Integration
The eDoc app provides an integration with OneDrive. A prerequisite is an app registration in Microsoft Azure / Microsoft Entra.
The following steps are necessary:
-
Perform app registration
-
Execute OneDrive initialization in BC
Creating an App Registration
Create a permission for your OneDrive application in MS Azure. Microsoft HowTo Configure OneDrive Integration with BC
The following data from the app registration is used in the OneDrive setup:
-
Tenant ID Your tenant ID
-
Application ID of the app registration
-
ClientSecret value of the generated client key
Setting up the OneDrive Integration
-
In the eDoc app, go to the OneDrive Setup page (Setup/File Systems/OneDrive Setup)
-
Click 'new entry' in the page menu
-
Fill in the following fields:
-
SharePoint URL URL of your SharePoint application e.g. https://contoso.sharepoint.com/
-
Azure Tenant ID Your Azure tenant ID
-
Client ID Application ID of the app registration
-
Client Secret
-
-
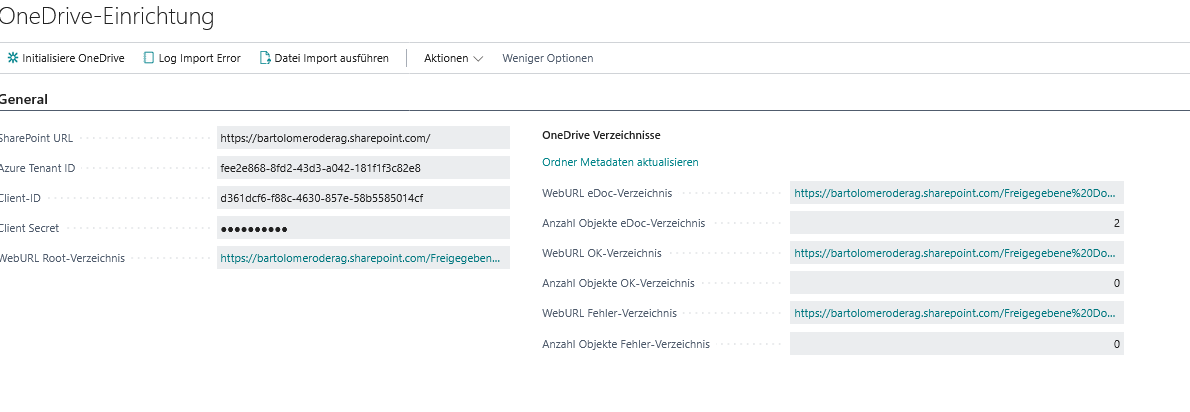
Run the function 'Initialize OneDrive'. This function checks the login and creates the subdirectory 'EDOC' in the root directory and further subdirectories 'OK' and 'ERROR'. After successful initialization, the fields under 'OneDrive Directories' are filled.
-
Check in OneDrive whether the directories were created properly.
-
Check whether the job 'EDOC-IMPORT-ONEDRIVE' exists in the task queue entries. If necessary, perform the Initialization of the Task Queue again.
-
Schedule the job 'EDOC-IMPORT-ONEDRIVE' according to your requirements.
Regularly monitor the Error directory!
The following screenshot shows a successful configuration.
For more information, please visit: brAG eDoc App